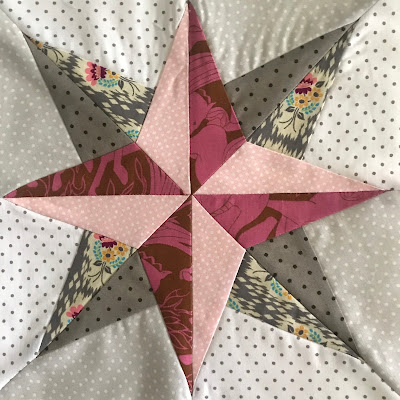
There are three shapes to this block. For each fabric you need to cut four pieces from that fabric if you are sticking to a less scrappy version of the block, which I am here. These pieces are directional, so if you want to cut more than one piece at a time, you need to make sure all four pieces of fabric are one side up (right or wrong side). The triangular shape of two of the pieces lends itself to using a rectangle to get four pieces out of two rectangles of fabric. For each shape I estimated the size of the rectangle needed by laying the template down and then turning it to 'nest' onto the other side of the rectangle on its long side. I cut two rectangles, laid the fabrics either both right side up or both wrong side up, cut the first piece (yield 2), turn the template to fit the rest of the rectangle and cut again (yield 2). Now you have all four pieces with two cuts and little fabric waste. For the larger background shape I cut four rectangles of fabric and stacked them all right or wrong side up and cut four at once.
You might be saying, what's with all the right and wrong sides. Remember these are directional pieces. If you stack the fabric and cut your set of four with the fabric right side up you'll get one set of shapes you need. With the next set of fabric, lay the template down the same way, but turn your fabric stack all wrong side up and you'll get the opposite or reverse of the shape. This way if you are using something sticky on one side of your template you don't have to gum up the other side of the template. Flip your fabric, not your template.
One last thing with these blocks. I didn't follow the directions...what! I sewed the first two blocks together following the directions exactly, and I had some issues with getting the block flat. You are supposed to make each unit (three pieces) and its reverse and sew those together to make a square quarter of the block. Then sew each square quadrant onto another and then each rectangle into the full block (think horizontal and vertical + quadrants). I found it much better to sew each unit and its reverse along the straight side of the longer triangle piece, making a triangular quarter unit. Then I sewed two of those together into half of the block on the diagonal, and then joined those two triangles into the finished block (think diagonal X quadrants). It was easier to match seams and the whole block was much flatter.
Went a little pink with these, but here's something different. I'm happy with the additional variety of background fabrics I used on this set of blocks. If you read my last post you will see what was happening previously with my backgrounds.
Do you always follow directions or do you find yourself finding other methods that work better than what the pattern tells you to do?
The blocks are adding up nicely! Keep checking my Delilah board for more inspiration or follow along on instagram @sewsomesunshine. See you soon for Block 6.


